Changes to HMRC’s filing service for company tax returns and accounts
HMRC is replacing its existing free filing software with a new online service designed for unrepresented companies with straightforward affairs.
You can use the existing Adobe template software until 31 December 2016 to file company tax returns and accounts for accounting periods ending on or before 31 December 2015, but not for later accounting periods.
The new online service is available now and you can use it if it suits your circumstances. The new online service does not require you to change any of your security settings.
Step-by-Step Guide to Changing Adobe Security Settings
If you are using the accounts template for the first time, you will need to change a number of settings within the Adobe template before use, to ensure the security certificate is set correctly. This guide will show you how to make the changes step-by-step and should take no more than a couple of minutes to complete.
The changes apply to settings within the Adobe template itself and should be done as soon as you open the downloaded file.
If you do not make these changes to the settings, you will not be able to submit the data within the template and will not be able to file accounts data using this method.
You will only need to change the settings once. You won't need to repeat the process should you wish to file the accounts template in the future for this company or any other (unless you use a different computer to file, as the settings are specific to the computer you are using).
Important note: the settings you are changing will NOT change or affect any settings on your computer itself. The changes only apply to the Adobe product and nothing else.
There are ten steps you need to take to change the Adobe certification settings:
Step one – open the template (PDF)
After you have downloaded and saved the file to your computer, open the file as normal.
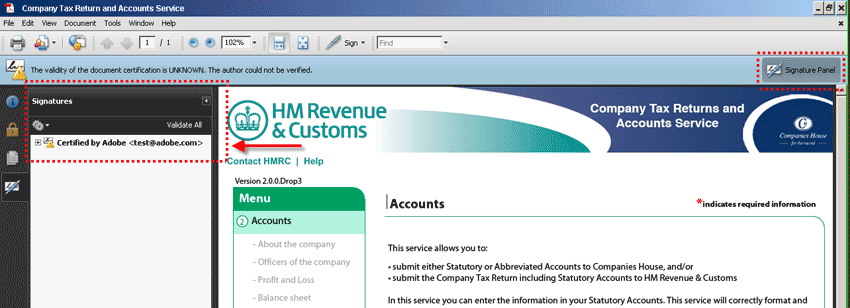
Initially, there will be a yellow triangle at the top-left corner of the screen within the blue banner – this indicates that changes to settings are needed.
To start changing the settings, select the 'Signature Panel' button at the top right-hand corner of the screen within the blue banner.

Step two – access the 'Signature Panel'
After selecting the 'Signature Panel' button on the blue bar, a panel appears on the left-hand side of the screen called 'Signatures'. In the example given, the text within the panel reads 'Certified by Adobe test@adobe.com'.
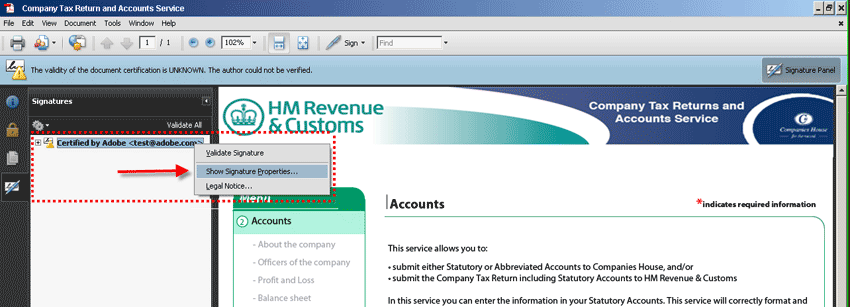
Step three – select 'Show Signature Properties'
Next you right-click on the top item in the list on the left-hand side of the screen called 'Certified by………' and a menu will appear. You then select the item in the menu called - 'Show Signature Properties'.
Step four– select 'Show Certificate' button
A new window will open called 'Signature Properties'.
Select the 'Show Certificate' button located towards the top right of the new window.

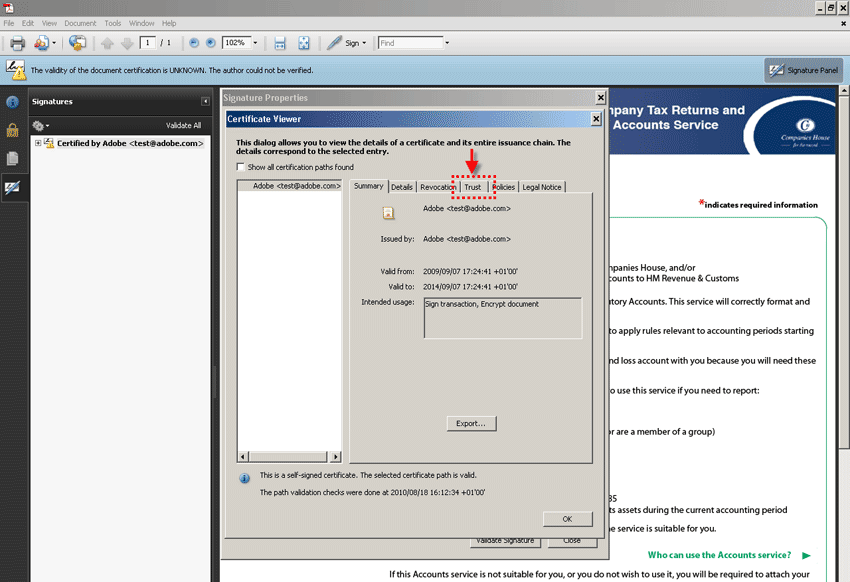
Step five – select 'Trust'
A new window will open called 'Certificate Viewer'. Select the 'Trust' tab – it is fourth tab along.
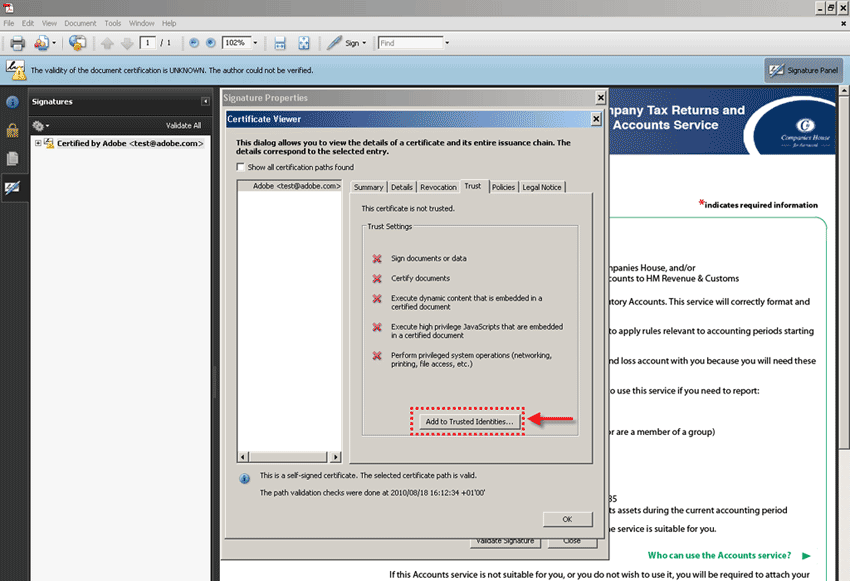
Step six – select 'Add to Trusted Identities'
Under the 'Trust' tab five 'Trust Settings' are displayed. Select the 'Add to Trusted Identities' button located at the bottom of the window beneath the list of 'Trust Settings'.
Step seven – accept warning on 'Trusted Identities'
You will be shown the following warning. Select the 'OK' button to continue.

Step eight – set 'Trust Settings'
A new window will open called 'Import Contact Settings' which you will use to set the trust settings for the form. There are six checkboxes displayed.
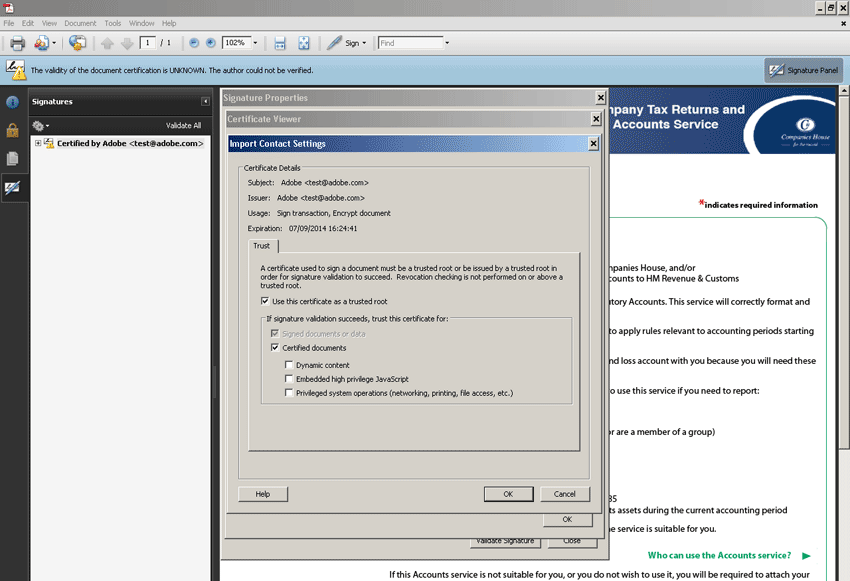
Ensure ticks are in place within all but the fourth checkbox (some ticks may already be in place). Ticks need to be in the checkboxes called:
- Use this certificate as a trusted root
- Signed documents or data
- Certified documents
- Embedded high privilege JavaScript
- Privileged system operations (networking, printing, file access etc.)
Select the 'OK' button to continue.

Then, close the 'Certificate Viewer' window by selecting the 'OK' button (the settings will still display with crosses until 'OK' is selected and the 'Certificate Viewer' window is closed). Next, close the 'Signature Properties' window by selecting the 'Close' button.
Step nine – validate all
After you have closed the window, look at the 'Signatures' panel on the left-hand side of the screen. Please validate the signature by selecting the 'Validate All' link on the top-right of the 'Signatures' panel.
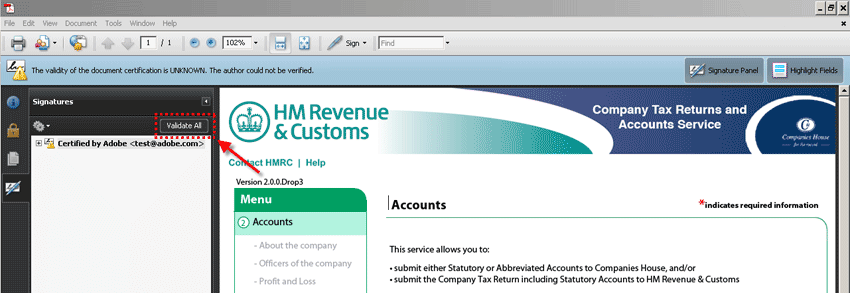
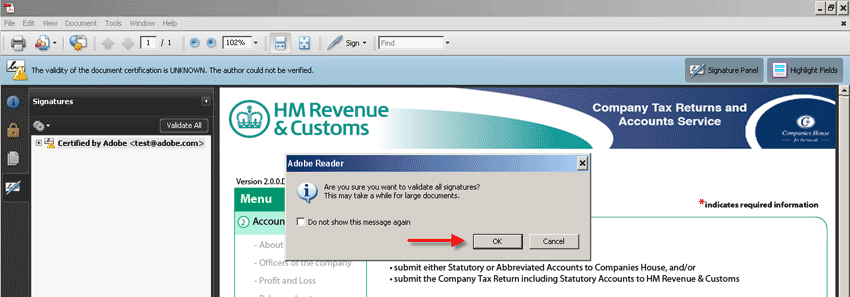
After you have selected the link, you will be shown the following warning. Select the 'OK' button to continue.
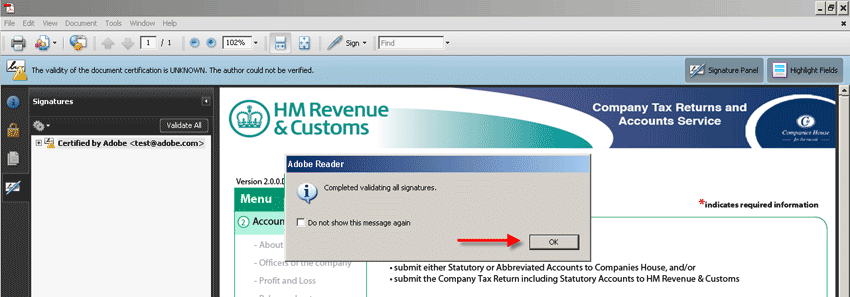
You will then be shown the following message. Select the 'OK' button to continue.
Step ten – confirmation
There are a number of indicators to confirm that the settings have been done correctly:
- the yellow triangle at the top-left corner of the screen changes to a blue rosette
- a blue rosette is also present next to the reference number in the 'Signatures' panel
You can check that all the settings are correctly set on the 'Certificate Viewer' by repeating Steps three, four and five as follows:
- Step three – right-click on the first item in the 'Signatures' panel and select 'Show Signature Properties'.
- Step four - select 'Show Certificate' button
- Step five - select 'Trust' tab to reveal the 'Trust Settings'
You should see the following pattern of four tick and one cross, as shown in the example below.

Certification is now complete.
Close the 'Signatures' panel on the left of the screen by selecting the 'Signature Panel' button in the blue banner. You are now ready to start using the accounts template.
![]()
Problems with Certification – only complete the following if you experience problems
If you experience problems or have made any mistakes when initially changing the trust settings, do not repeat previous instructions to correct it. Instead, follow steps eleven to fifteen below, before returning to Step three (above) to complete certification.
Step eleven
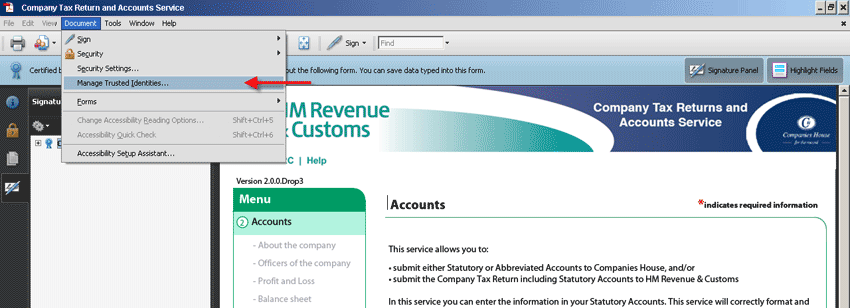
Select the 'Document' option from the tool bar at the top of the screen and select 'Manage Trusted Identities…' from the menu.
Step twelve
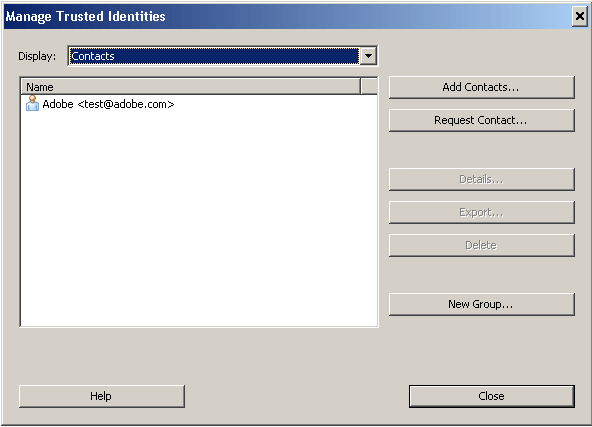
You will then be presented with the following screen (Adobe test@adobe.com is included as an example only).
Step thirteen
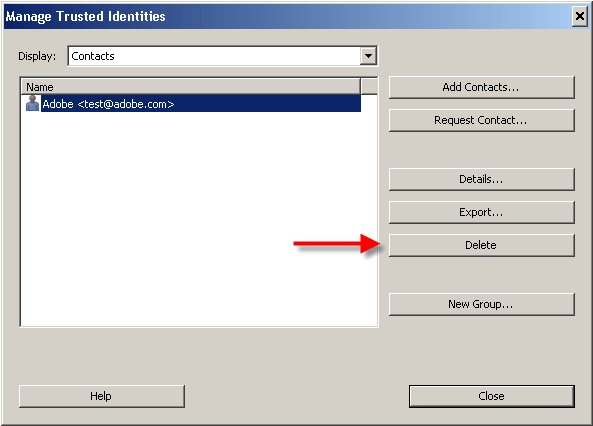
Select the entry under the 'Name' heading and then select the 'Delete' button on the right of the screen.
Step fourteen
You will then be shown the following Adobe security message. Select the 'OK' button to continue.
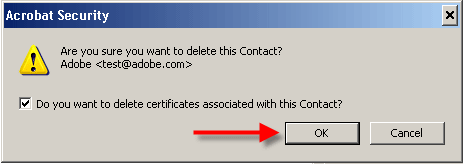
The entry is removed from the 'Name' list. Select the 'Close' button to continue.
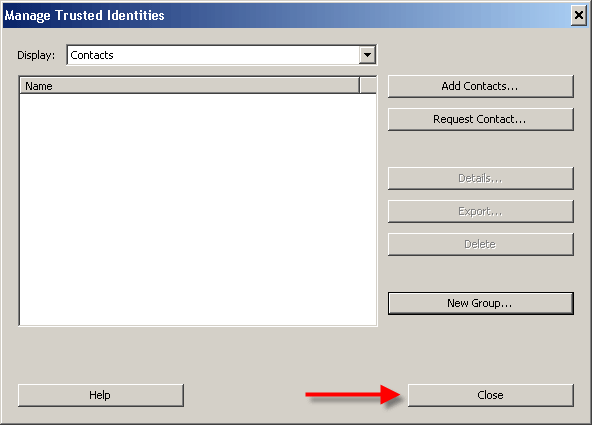
Step fifteen
Return to Step three and progress through each of the following steps to complete your 'Trust Settings' again.
- Step three – right-click on the first item in the 'Signatures' panel and select 'Show Signature Properties'.
- Step four - select 'Show Certificate' button
- Step five - select 'Trust' tab to reveal the 'Trust Settings'
- Step six – select 'Add to Trusted Identities'
- Step seven – accept warning on 'Trusted Identities'
- Step eight – set 'Trust Settings' (as shown below)
- Step nine – validate all and select 'OK' on both warning and confirmation messages
